
SCI Goats: Value Added Products Offer So Much
My name is Erin Link and I have been raising SCI goats in western Wisconsin since 2013. I have been making goat milk soap exclusively from SCI goat milk since 2015. As my goat herd grew I started venturing into selling extra SCI goats for meat and am now pursuing tanning goat hides. Tanning in general can refer to either hair on hide tanning or the leather making process. In this article I am sharing a hide on tanning method. There is a whole language around tanning, and I’m still learning new words and what they mean. This “Leather Dictionary” has been a helpful tool in this learning process.
With this tanning journey, I will start off by saying that I am pursuing natural hide tanning methods because I do not like the chemical process of tanning hides for personal reasons. I encourage everyone to do their own research on more natural methods versus chemical methods.
Another helpful thought I’ll share right away is that these natural tanning methods aren’t that hard. I’ll go into more detail of course, but these are your basic steps.
BASIC STEPS:
Salting a fresh hide.
Fleshing the hide after it has been salted.
Pursuing either a mineral or brain/egg yolk or other tanning procedure.
Making sure you have time to stretch or break the hide as it slowly transforms into a beautiful and usable hair on goat hide.
The steps are simple, but they do require a lot of physical work and some steps demand attention in a very timely manner. So, if you don’t have the time to spend on stretching and breaking the hide, your hide will turn out very stiff like a board.
Tools are an important part of tanning hides. I have worked on fleshing hides without the proper tools, and it was really hard on my body. I advise you to obtain the following items.
A fleshing beam
At least one double-handled fleshing knife and a smaller knife. I prefer an ulu knife.
Large plastic barrels or buckets for washing hides in.
Access to water, preferably an outside garden hose for rinsing off hides.
If possible, use a power washer, but be careful as power washers can punch holes into your hides. Power washers allow you to more quickly clean up messy hides without using as much water.
Create a frame to stretch your hide or use random pieces of tools to help stretch your hide. I use a broken ax handle to help stretch my hides, as well as a support beam in my garage. I do just use random pieces of furniture to help me work on hides. I know it sounds a bit silly, but it works!
Let’s start off with dealing with your fresh hide! To clarify, I’m focusing on the mineral tanning method. I have done the egg yolk and brain tanning but it’s a bit more complex. Tanning skins and hides with fats and oils is a very old method. It involves using fat-rich animal substances such as brain, fish oil, sebum or marrow. It can also be done with soap, claw oil, yak butter or egg yolk. In olden times, animals were mainly hunted for food, clothing and shelter and using animal fats to preserve their skins was common practice. Full tanning definition guide can be found here.
1. Dealing with your fresh hide as quickly as possible is important. Bacteria start growing and the rotting process begins quickly. To inhibit the bacterial growth, you need to lay your hide down with the flesh side toward you. I often put my hides on pallets at a slight angle, and then use 50# bags of livestock salt and salt your hide liberally. Don’t hold back, put a good thick layer of salt on ALL of the flesh. If you miss spots, this will let rot happen and this will cause slippage. Slippage is when the hair on your hide starts falling out, and you don’t want that to happen!

This is the hide about a week after it was salted. I have it over the fleshing beam so salt has already fallen off.
2. Keep your hide in an area out of the weather. Your hide will slowly start to dry out with the salt essentially curing it. There may be liquid draining off the hide, but make sure your hide stays covered in salt and reapply if needed. Check the hide at least twice a day for the first 3-5 days. Your hide can remain viable for at least a year more in this salted condition. I have worked on 5-year-old salted sheep hides and found they were no longer viable, so there is a limit.
3. Fleshing the hide is the next step. You want to take your salty hide and rinse it off with a hose. Getting all the salt off both the flesh and hair side. Put your hide onto your fleshing beam and start fleshing. Here is a video link of that fleshing process. It’s a bit hard to describe, but you aren’t cutting the excess flesh off. Rather you are pulling the flesh down and off. It reminds me a bit of scraping gum off a smooth surface.
Youtube video-https://youtu.be/2ycDNTk3lCw


Left: Fleshing the hide after I rinse salt off. Right: About halfway done fleshing the hide. This shows how the flesh is pulled down working from neck down to the tail end. The hide after the flesh is pulled off is nice and clean. I use my smaller ulu knife to flesh the edges. Make sure your knives are fairly dull during this process. Remember, you aren’t cutting the excess flesh but more pulling it away from the hide.
4. It may take at least an hour to sometimes three hours to flesh a hide. You will be quicker and better as you keep working on techniques.
5. After fleshing I wash my hide again. Often I will fill a plastic barrel with water and some laundry soap or dawn dish soap. This should be a wash where you get as much gunk off the hide and wash out any blood stains. Treating this as a final wash.
One of the many rinses using my garden hose. A little tip! Fleshing your hide while it is still somewhat damp makes things easier. If your hide starts drying out when fleshing, just take the garden hose and give the hide a bit of moisture.
6. Let your hide dry out for a while until the flesh side starts to become tacky and the hair side is mostly dry. Depending on humidity, this drying process can be as quick as an hour or half the day or even longer. If you can work in a controlled climate a dehumidifier would help the hide dry up quickly.

Letting my hide dry out a bit before I put my mineral paste on the hide side.
7. This is where you will add either your mineral mix paste OR egg yolk or brain paste to the hide. This is where the egg yolk/brain tanning method and mineral tanning method will take different paths.
8. You will add your mineral paste to the hide much the same way you initially salted your hide. The paste needs to cover every bit of the surface of the flesh to inhibit bacterial growth. You can put your hide down flat on a cement surface or pallet.
9. The hide and paste will dry out over the next 3-4 days. You can leave your hide in this state for up to a few years as well!
10. After that 3-4 day time period you can scrape the dried mineral paste off your hide. You can even re-use this dried paste for a future hide.
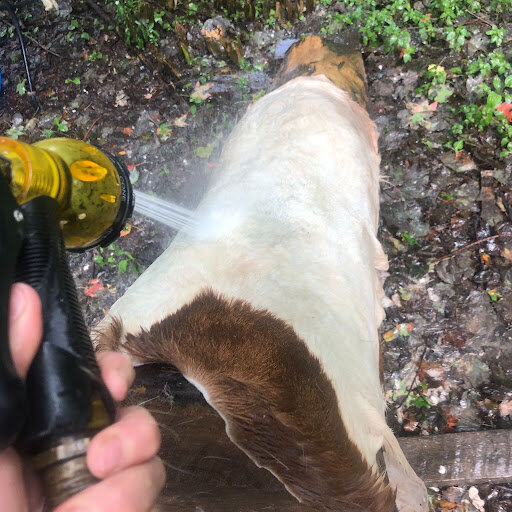
11. There is a final quick wash, and this is where a power washer comes in really handy. Spray out the mineral paste mix and gently wash one more time if necessary.

The final rinse! I shook out the mineral paste that had dried up on the hide. I then quickly rinsed the hair and skin side of the hide off. The cornmeal can be a bit messy. But remember that this hide will dry and you can easily shake or even vacuum out excess cornmeal.
12. Shake your hide out and let the hide dry slowly. This is where you need to keep a keen eye on the hide. As the hide starts to have a tacky feeling this is when you start stretching and breaking the hide. You will see the hide become white in the areas that are drying out and being stretched. You need to keep working hard on this stretching process. Coming back to the hide every 15 minutes or so to keep working at it.
13. After your hide is fully dry and stretched you can now move onto the sanding method. You can sand by hand or invest in an electric sander. This will help sand off any loose pieces and it helps to smooth and soften the whole hide.

Sanding and stretching will happen after your hide dries out again. Sanding should be done specifically when your hide is dry. If the flesh side of the hide is still damp, the hand sander doesn’t work very well.
During this process of stretching and sanding I take breaks and come back to the hide every 15-30 minutes. Stretching/breaking the hide is crucial during this time otherwise your hide will not be soft.
14. If you want, you can get a finer grain of sandpaper and buff the hide as well.
Congratulations, you now have your finished mineral tanned hide!

The finished product. The skin side of the hide should turn a nice white color. You may see some staining on the hide from fat or from tools you were using to stretch your hide. This hide is from a 5 year old buck. Even though I washed this hide at least three times he still smells a bit goaty. I let the hide sit outside in the sun and fresh air for a few days and used a tea tree oil spritzer to help diminish the goat smell. I have yet to try it, but a friend suggested spritzing vodka on the hide. This is apparently an old theater trick they use for smelly costumes!
I will list resources below and I encourage people to do their own research and practice on their own. There are many recipes out there for a mineral tan mix, as well as some different steps taken during this tanning process. In addition to this mineral tanning process, there is also the above mentioned egg yolk/brain tanning as well as vegetable tanning.
Creating tanned hides and leather are just two by-products that would otherwise be wasted. In addition to those are cleaned skulls and horns with a potential for cleaned hooves. If you have a SCI goat that dies or you are choosing to have your SCI goats enter the food chain, utilizing as much of the goat as possible not only honors the animal, but can also potentially help you the farmer or breeder bring money in from this value added product.
Supporting each other is key to helping preserve SCI goats. I received a lot of support from a new WI based tannery when I inquired about my own pursuit in hide tanning. The women at Driftess Tannery offered a lot of important tips and tricks, and just general support. I highly recommend sending hides to them.
Finding purposes for our goats and utilizing them is one of many steps to helping preserve this breed or any other heritage breed animal. Being able to take this journey with my SCI goat herd has been eye opening and may pave a path for other SCI goat breeders to follow.
You certainly don’t have to tackle this tanning process yourself. Finding a tannery to send your salted hides to is always an option. I see tanned hides selling from $150-$400+ depending on size and appearance. The same can be said for cleaned goat skulls that fall into that I have seen sell from $50-$200+. Paying for the service of tanning or skull cleaning to be done would still leave room for you the breeder to make some extra income.
Keep your eyes and ears peeled. I’ll put in my own personal plug and say that I’m hoping to pursue offering my own hide tanning services next year. With that I have an idea to offer a discount to any of you wanting to get your own SCI goat hides tanned. You can keep up to date through all of EB Ranch’s social media and website- www.ebranchllc.com
We cannot and should not rely on the rarity of a livestock animal alone to set it apart from other like heritage breed species. We need to keep working on WHY new breeders would consider buying SCI goats, and think about what do these goats have to offer?
-Erin Link, EB Ranch LLC
List of Resources
In this list you will find recipes for creating your own mineral tan mix
Aurora Blue Farm offers online classes on how to egg yolk/brain tan hides. I personally paid for this class and learned a lot from it.- https://www.aurorabluefarm.net/
An article listing many tanning methods and resources- https://www.backcountrychronicles.com/how-to-tan-a-hide/
The mineral or alum tanning or tawing process on video. This is basically the same steps I take in tanning my own hides with this method.- https://youtu.be/gY32A_Exgoo
Links
Two handled fleshing knife- https://www.wiebeknives.com/products/weibe-8-double-handle-fleshing-knife?variant=21076727681
Ulu knife- https://lamsonproducts.com/products/ulu-knife
Driftless Tannery from Wisconsin has a few pages dedicated to proper hide salting, fleshing beam dimensions and tools.- https://www.driftlesstraditionaltannery.com/hide-preparation
Hide, skin and leather fact sheet- https://thesustainabilityalliance.us/u-s-hide-skin-leather-fact-sheet/
Skillcult has a wide range of social media, from a very informative youtube channel to beautiful pictures. This guy even tans goat stomach to create useable containers!- http://skillcult.com/
Buckskin Revolution also offers a wide variety of classes, tools, and tips- https://www.buckskinrevolution.com/